We here at B3ta love it when a plan comes together. Tell us about incredible projects and stuff you've built by your own hand. Go on, gloat away.
Thanks to A Vagabond for the suggestion
(
« Go Back
 I've always
got a multitude of projects on the go. Some of you may remember the 'techno-diy' QotW a while back.
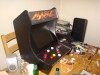
However, my latest is this:
Video of it working here: youtu.be/3BjWlcvNA7U
I have a soft-spot for old arcade games - Defender, Stargate, Lunar Lander etc... - probably a result of a mis-spent childhood in local arcades, however.
I also converted a USB keyboard into a controller for the buttons/joystick etc...
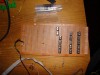

Now this works fine, but I forgot about the bounces that I'd get from mechanical switches - I press DOWN on the joystick and it sends TWO/THREE or more signals to the controller and in some cases makes the game impossible to play.
I phoned a local PCB making firm to find out how much it would cost to make the board for me - but this time with some 1uf caps across the switch to stop the bouncing. It took me days to solder that up and I just don't have the heart to do it again. They quoted me £5.50 per square inch. So that's not happening then!
I started thinking that it can't be all that hard to make my own PCBs at home.
I found snippets of info in the interwebs from others that have attempted to do the same.
Basically, I have a Konica Laser printer. Laser toner (for the most part) is made from plastic and is melted to the paper.
I figured that if I printed a circuit board out, then pressed it to a copper clad board with a laminater that the heat would melt the plastic to the copper. Then all I'd have to do is to get rid of the copper that was left displaying, then scrub the toner off the board and I'd be left with my copper print waiting for me to solder the bits into it.
So I tried it. I bought some Ammonium Sulphate on ebay for a few quid, disolved it in boiling water, added my newly melted toner-on-copper to mix. Shook it about a bit, and voila! The copper melted away. I scrubbed the toner off and it only bloody works!
This is the result:
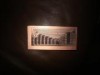

I've wired those LEDs into an Arduino and they all work fine. Incidently, to get more practice, I remade that little LED board with a resistor array instead of single resistors, I just don't have any pics of that.
So now that my little test is over, I have to repeat the process with the larger replacement board for the mini-arcade box and I've finally finished a project rather than getting it to about 80% and leaving it!
...and being able to print my own PCBs means that my house is now going to be full of little home-made gadgets that will no doubt please and delight the misses. Oooerr.
Yay me!
(, Fri 18 Nov 2011, 10:55, 18 replies)
Printing your own PCBs is impressively nerdy.But for the hassle of doing it yourself, isn't £5.50 an inch comparatively cheap?
(
Nah - for this board alone it worked out at over 200 quid all in. Oddly, if I ordered 10 it was the same price. If I ordered 100 it was the same price. I guess all the work goes into the first one.
Now I have refined the process a bit I can make these boards in about 40 minutes (depending on the size) - start to finish including the drilling and soldering.
(, Fri 18 Nov 2011, 11:06, closed)
I suppose it isThe quote they gave me was after sending the diagram to them.
To be honest, this was much more fun than just sending the diagram off to someone, paying money and waiting for it to made for me.
And at £3.50 for half a litre of Ammonium Sulphate and a quid for each copper clad board, it's much cheaper too.
(, Fri 18 Nov 2011, 11:22, closed)
No diggedy.Etching your own PCBs is level three nerdery.
(
Only level three?I'm dissapointed.
(, Fri 18 Nov 2011, 11:38, closed)
Level four nerds make their own transistors(
Level 5Make rudimentary ICs using tiny transistors.
(
RE: Switch bouncingWhy not just use a logic latch on some veraboard? Ten times easier and probably more efficient.
(
I originallythought of using a 555 in stable mode as a flip-flop logic latch, but seriously; easier than putting a capacitor across each switch?
Nah.
Plus, as you can see in the pic, the original is on a veroboard. Too much soldering and far too fiddly, plus (as happened recently) the wires create a bloody rats nest and are prone to pulling away when moving the box.
PCBs are the future!
(, Fri 18 Nov 2011, 11:24, closed)
I thought about using this:www.maplin.co.uk/beginners-etching-set-45873
Very amateur compared to yours though.
(
That looks coolTo be honest, I'm doing the exact same thing (I can't see which chemical is used in that kit for the etching), but with a chinese take-away box instead of an 'etching tray'.
(, Fri 18 Nov 2011, 12:22, closed)
Ferric ChlorideIt's not obvious how you get the images onto the board in the first place. I know Maplin sells a pin for such things but it's not going to look very good (or even work) with my wobbly hands.
(
I print the image to old magazine paper (it comes off easier in water), then wrap it around a sheet of A4 and feed it through my laser printer. I then iron them on to the board with a normal clothes iron. It's just about the only time I've ever used one.
I'm experimenting with an old laminator. If I get get that working I have a more automated process - and one that isn't quite as hit or miss. I miss about 20% of the time, which means scrubbing the toner off the copper and starting again. If I can eliminate this bit, then all the better.
For the etching, I'm using Ammonium Persulphate - 1. because it's a clear liquid so you can see the etching working, and 2. Because it doesn't stain everything it comes into contact with like ferric chloride.
(, Fri 18 Nov 2011, 14:03, closed)
Makes a lovely cocktail with some baileys and blue curacao too.disclaimer: this might not necessarily be a lovely cocktail
(
"Etch-resist" pens could be your answer.It's what we used in my apprenticeship. You can get them in Maplins and cheaper just about anywhere else.
The main problem I had was breaking the tiny 1mm drills, but at least I didn't have to pay for them.
(
To be honestI made a few more last night with HELLO 90 gram ART paper. It's a bit more of a bastard to come off once ironed on but the results are so much better. No broken lines and it works perfectly. I think the key is the paper. I nicked a etching pen from work in case I had broken lines. So far, I haven't had to use it.
(, Sat 19 Nov 2011, 20:42, closed)
When the world inevitably descends into a Terminator-esque technologically advanced dystopia, I want to be on your team.
(
But what if it descends intoZombie-ism?
(, Fri 18 Nov 2011, 12:51, closed)
On the balance of probability, I'll most likely be a zombie by that point, so I shall simply eat his brains.
(
Why thank you........although that's part of my problem. I research these things until I can *almost* do them, then lose interest. Nearly everything I've ever made is about 80-90% complete. The dotting the 'I's and crossing the 'T's is not my forte.
(, Sat 19 Nov 2011, 21:54, closed)
Good work!I've been tempted to start making my own PCBs but the toner transfer technique seems like it involves a fair amount of trial and error (I've only previously used the UV exposure technique with photoresist boards). Yours seem to have come out very well - I suspect using a laminator instead of the usual clothes iron might have something to do with that!
(
I've gone back to using an iron.I've changed the paper to HELLO 90 ART and the results are fantastic every time. I have to iron it on for a bit longer and it's much harder to get off the copper once ironed, but it works a treat every time.
One I did Friday:
a8.sphotos.ak.fbcdn.net/hphotos-ak-snc7/s320x320/309885_10150476006140152_577405151_10662924_381667128_n.jpg
I'm surprised that no-one has mentioned the little arcade machine that triggered this home-printing-pcb off. Maybe everyone makes one.
(, Mon 21 Nov 2011, 8:08, closed)
« Go Back